To enable safe and encrypted connection between your Apache server and users, you must first generate a CSR (Certificate Signing Request) in order to get an SSL/TLS certificate. In this guide, we’ll walk you through the process of generating a CSR for Apache.
To enable a secure and encrypted connection on your Apache server, follow these steps.
How to Generate CSR for Apache Web server with OpenSSL?
Generating a CSR for Apache web server shouldn’t be an overly complex process provided that the right protocols are enabled in the web server.
Here, you will see how to generate CSR for Apache web server with OpenSSL.
- Step 1: Log in to your Server: You must log into your server via a secure SSH terminal. This is crucial for ensuring a protected terminal connection.
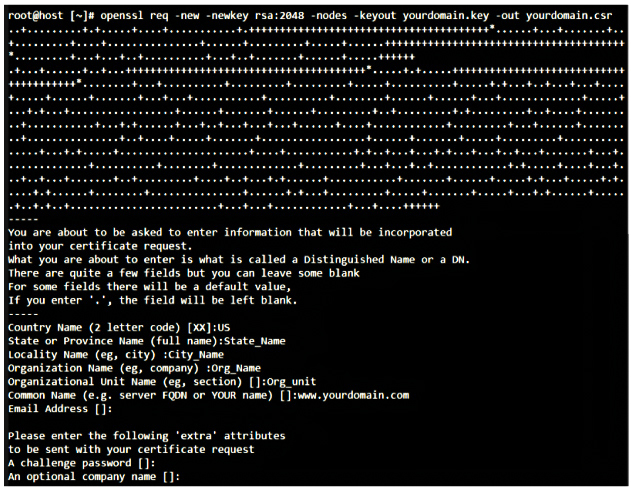
- Step 2: Create an RSA Private Key and CSR: Once logged in, proceed to generate a RSA private key and Certificate Signing Request.
Here’s the command to execute for that purpose:
openssl req -new -newkey rsa:2048 -nodes -keyout yourdomain.key -out yourdomain.csr
When you execute the command above correctly, it will initiate the creation of a private key. The private key will be named ‘yourdomain.key’ and have a length of 2048 bits.
- Step 3: Enter Key Information for the CSR: It is now in this step that you provide the key information that is to be included in your CSR. It is simple; just follow the prompts for Country Name, State or Province Name, Locality Name, Organization Name, Organizational Unit Name, Common Name, Email Address, Challenge Password and Optional Company Name.

Country Name Enter the country’s two-letter code where your organization is legally registered. Include the 2-character ISO format country code in the CSR. For example, include “GB” for Great Britain and “US” for the United States.
State or Province The full name of the state/province where your company is located. Locality or City The full name of the city/locality where your company is incorporated. Company/Organization Enter the full legal name of your company. Organizational Unit Enter your company’s niche, such as HR, IT, etc. Use the Enter key on your keyboard to skip the OU field. Common Name The fully qualified domain name (FQDN) for which the SSL is to be enabled (www.yourdomain.com or yourdomain.com). Just avoid port numbers, special characters, “http://” or “https://” or IP addresses.
Note: When generating a CSR for a wildcard certificate, the common name should be entered after an asterisk (For E.g., *.yourdomain.com).
When prompted for email address, passphrase (challenge password) or Optional Company Name, leave it blank. You can use these to give your key pair extra security.
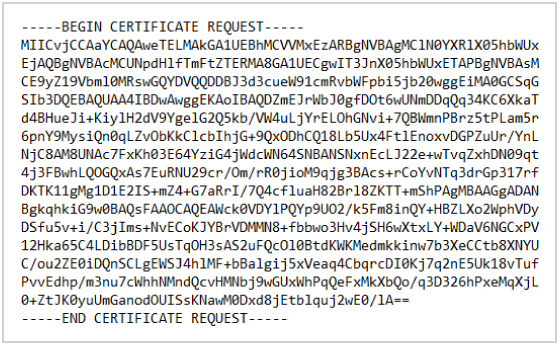
- Step 4: Two files are generated: .CSR and .key (CSR and Private key).
- Open the .csr file with a text editor like notepad.
- Copy the entire content, including BEGIN and END lines as shown below, for later use when enrolling for the certificate.

- Step 5: Save Your Private Key: Be sure to save your private key (‘server.key’) for future use during certificate installation.
And that’s it! Those are the steps to generate CSR for the Apache web server.


