Discover the seamless process of generating a Certificate Signing Request (CSR) for Citrix in this concise guide. Enhance the security of your Citrix deployment by acquiring SSL certificates. Buy SSL certificates to ensure the confidentiality and integrity of data transmissions.
Follow our step-by-step instructions for a secure SSL certificate integration with your Citrix environment.
To generate a CSR for Citrix, you will first need to create an RSA Key (Rivest, Shamir, and Adleman). Essentially, it is the initial step.
Please note: These instructions given below may only work for Citrix NetScaler VPX (10, 50, 200, 1000, and 3000). That said, you may need to subtly adjust them depending on the Citrix NetScaler VPX version you’re using. Here are the versions of Citrix NetScaler VPX that the instructions below may be applicable to;
- Citrix NetScaler 9.3+ VPX
- Citrix NetScaler 10.0+ VPX
- Citrix NetScaler 10.1+ VPX
- Citrix NetScaler 10.5+ VPX
With that out of the way, here is a simple step-by-step Guide on how to create an RSA Key;
How to Create an RSA Key
- Step 1, Access the NetScaler Device Console: Log in to your NetScaler device console to begin the process.
- Step 2, Navigate to SSL Configuration: In the NetScaler console, navigate to the Configuration tab. Expand “Traffic Management” in the tree menu and select “SSL.”
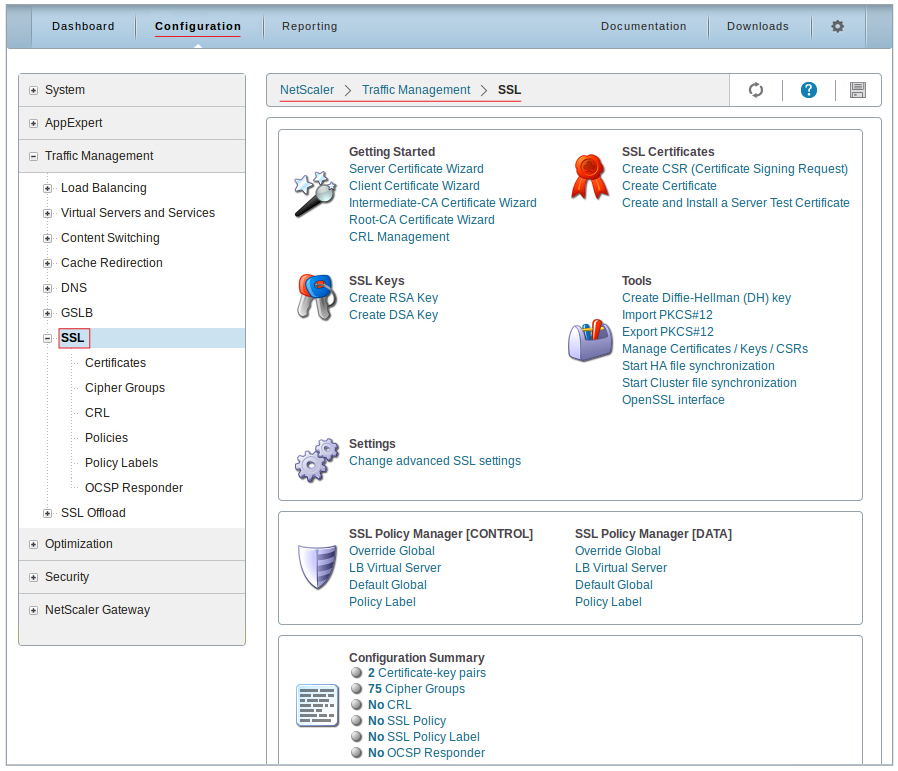
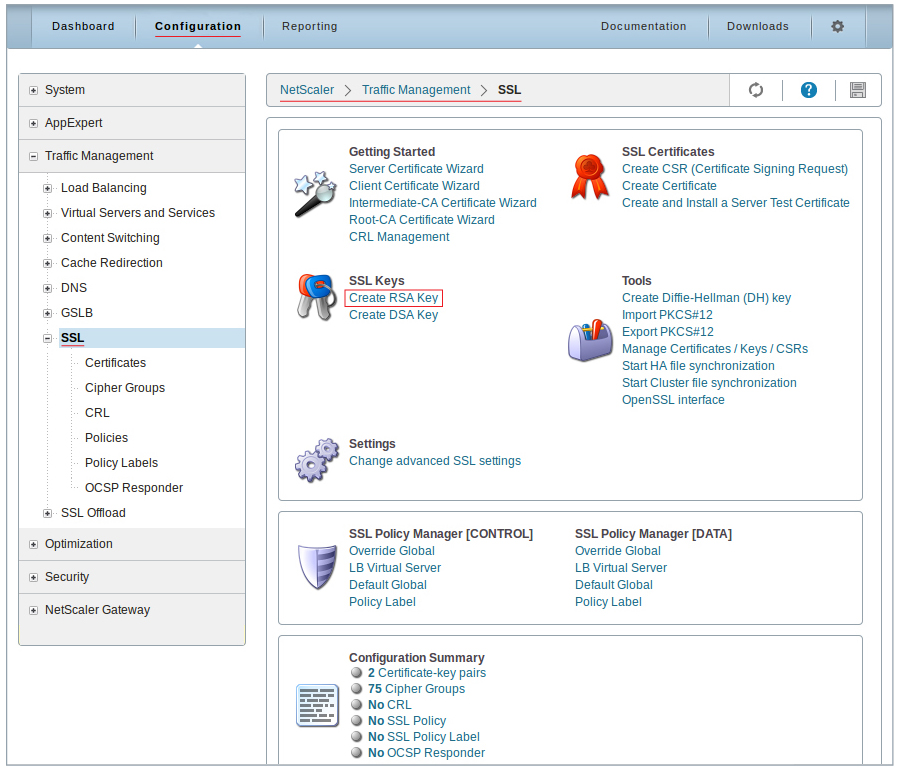
- Step 3, Create RSA Key: Under “SSL Keys” on the “NetScaler > Traffic Management > SSL” page, click “Create RSA Key.”
-
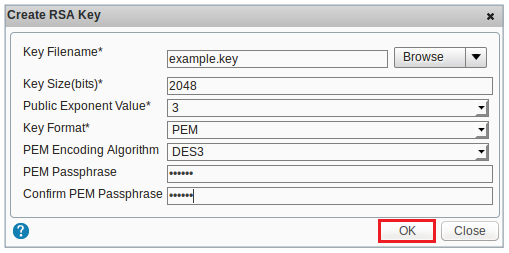
Step 4, Enter the Needed RSA Key Information which includes;
Key Filename Provide a distinct name for the file that stores the RSA key. For instance, you can name it ‘example.key.’ Key Size (bits) Write 2048. Public Exponent Value Choose from the dropdown list: 3 (Hex: 0x3) or F4 (Hex: 0x10001) as the default cipher algorithm value. Key Format Select “PEM,” the recommended SSL Certificate format. PEM Encoding Algorithm (Optional) Choose an encryption algorithm (e.g., DES or DES3) for the generated RSA key. PEM Passphrase (Optional) Enter a passphrase for encryption, if desired. Confirm PEM Passphrase Re-enter the passphrase if provided. - Step 5, Confirmation and Closure: Click “OK” to confirm the RSA key creation. After that, click “Close” to complete the process.
How to Generate CSR
After generating an RSA key, the next step is to create a Certificate Signing Request (CSR) for your SSL Certificate. Here is how to create CSR for Citrix;
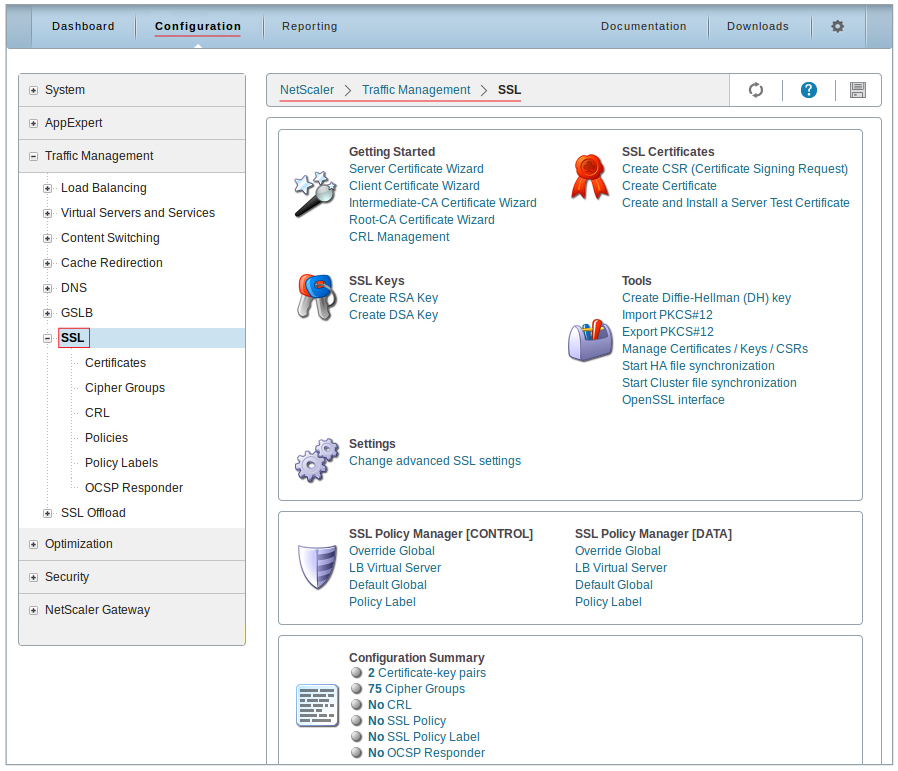
- Step 1: Navigate to SSL Configuration: Within the NetScaler console, proceed to the Configuration tab. Expand “Traffic Management” in the tree menu and select “SSL” as shown below;
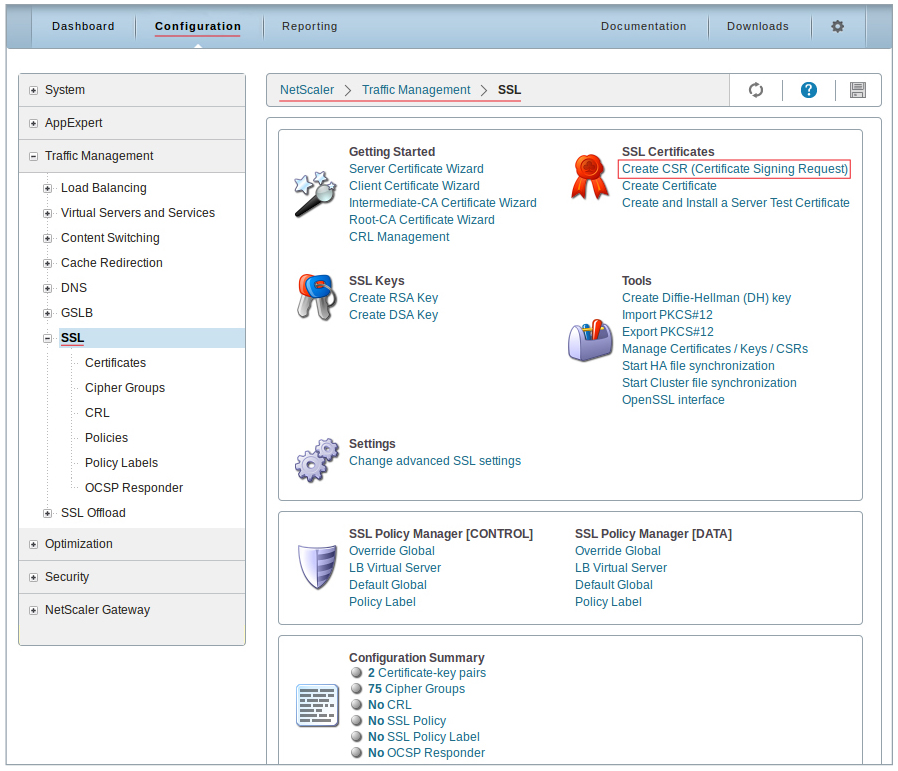
- Step 2: Initiate CSR Creation: Under “SSL Certificates” on the “NetScaler > Traffic Management > SSL” page, click “Create CSR (Certificate Signing Request).”
-
Step 3: Enter the Required CSR Information which includes;
Request File Name Name the request file (e.g., example.csr) Key Filename - Select “Appliance” from the Browse drop-down list.
- Browse and choose the previously created RSA key file (e.g., example.key).
- Click “Select” and then “Open”.
Key Format Choose “PEM,” the recommended SSL Certificate format. PEM Passphrase (Optional) Enter the passphrase if previously set during RSA key creation. 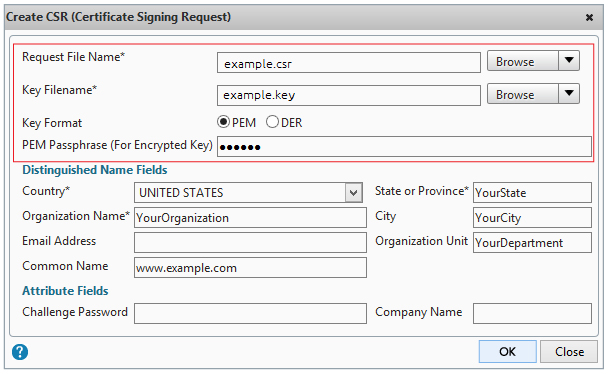
-
Step 4: Enter Distinguished Name Fields:
Country Select your company’s legally registered country. State or Province Enter the state or province of your company’s legal location. Organization Name Write your company’s legally registered name. City Write the name of the city of your company’s legal location. Email Address This is Optional. So, you can leave it blank unless specifically required. Organization Unit This is also optional but you can add the department name within your organization. Common Name Write the name used to access the certificate, often the fully qualified domain name (FQDN) like www.yourdomain.com or yourdomain.com. 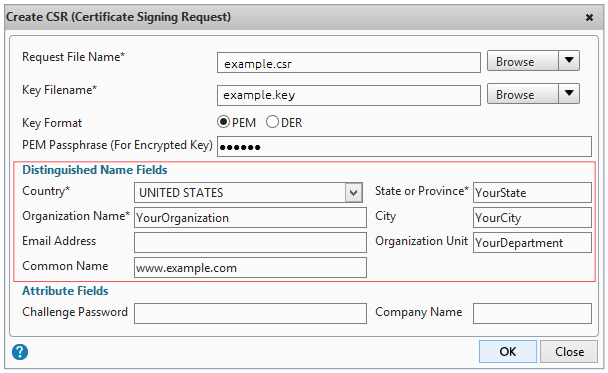
- Step 5: Enter Attribute Fields:
- Challenge Password: Create a password for future certificate installation. Ensure it is difficult to guess but easier for you to remember
- Company Name: This is optional but you can add your company’s name as it is.
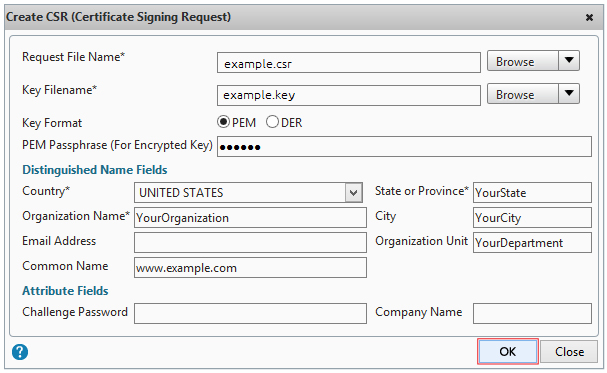
And that’s how to generate CSR for Citrix. To wrap up, click “OK” to confirm the CSR details. And then “Close” to complete the CSR creation process.
- Step 6: Now follow these steps in the NetScaler console:
NetScaler > Traffic Management > SSL > Tools>Manage Certificates / Keys / CSRs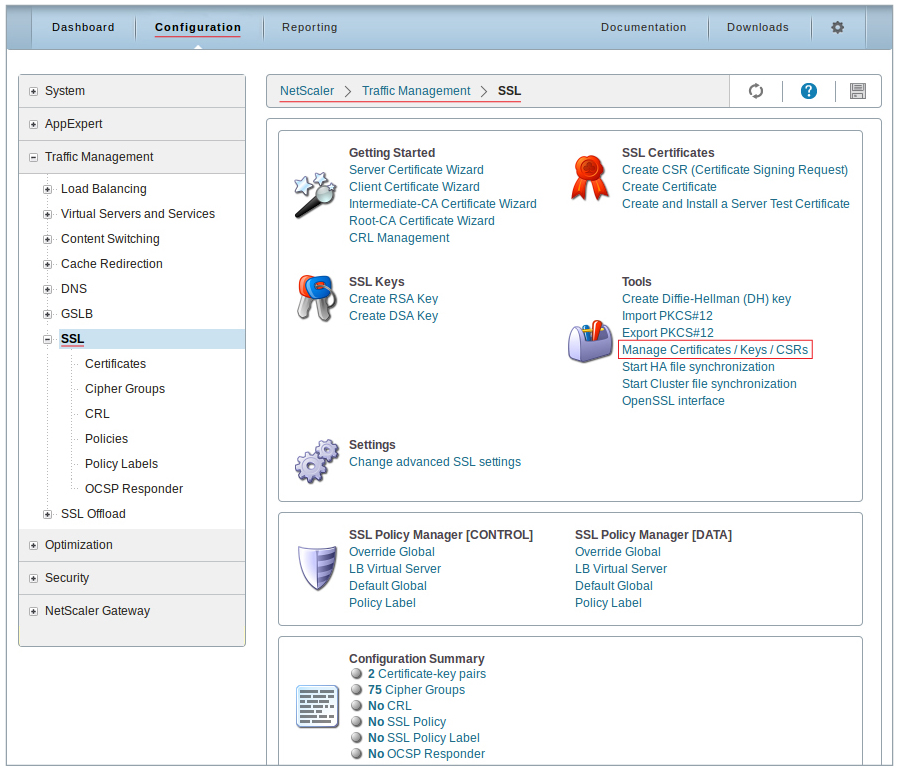
- Step 7: Select your CSR or request file (example.csr) in the Manage Certificates / Keys / CSRs box, and then click View.
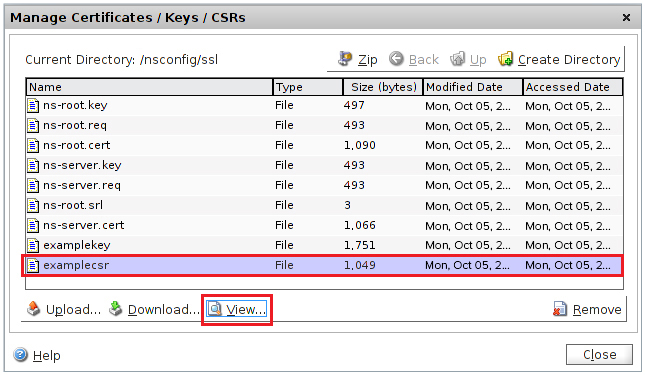
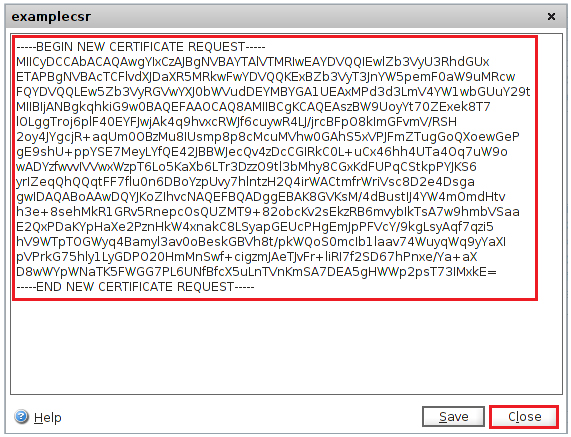
- Step 8: Copy the text of your CSR, together with the tags —–BEGIN NEW CERTIFICATE REQUEST—– and —–END NEW CERTIFICATE REQUEST—– from the “CSR” window (example.csr) and paste it into the order form.
In Closing
Congratulations on generating your CSR for Citrix! Do note that an SSL certificate, even a valid one from a reputable CA isn’t a “set-it-and-forget-it” aspect of cybersecurity. You will still need to regularly renew the certificate, update settings if needed and keep abreast of the latest developments to ensure that you maintain a secure environment.

