SSL certificates are your supersaver without cape securing the communication for every user request for data. These digital certificates allow you to secure data between the browser and the server.
Cybercrime costs are increasing for businesses, and cheap SSL certificates can help you reduce such expenses. According to Cybercrime Magazine, the cost of preventing cybercrimes is growing at 15.5% yearly, with the expected expenses reaching $10.5 billion. So, there is no denying that you need an SSL certificate.
However, getting an SSL certificate begins with a certificate signing request (CSR). It includes all the information about your organization, which certificate authority will verify and issue the certificate. This article will focus on a step-by-step method to generate CSR on the cPanel.
What is cPanel?
cPanel is one of the most popular control panels used for web hosting that you can use to generate CSR. It allows administrators to handle and manage all the web hosting requirements using Web Host Manager(WHM). You can install cPanel and WHM from the official website.
However, cPanel is not free, and you need a trial license. cPanel licenses come in different options, like static and publicly visible IP addresses. To install cPanel and WHM, you need to log in to the server as a root user and run the following command:
cd /home && curl -o latest -L
https://securedownloads.cpanel.net/latest && sh latest.
The above command is compatible with Linux OS, so you must first analyze your system’s compatibility to install cPanel.
The benefits of using cPanel for CSR generation are:
-
User-friendly Interface
cPanel comes with a graphical user interface, making it simple to navigate and easily manage websites without requiring technical skills. With fewer technical skills, it is easy to generate CSR for cPanel.
-
Easy to Install
cPanel installation is simple, providing a one-click installer pre-built with the package. If you are using Linux, installation becomes easier using a code.
-
Higher Security
cPanel offers higher security than other platforms, which you can use to manage websites. You can buy SSL certificates from leading certificate authorities (CAs) and even use a firewall with cPanel to protect your website.
-
Database Management
Managing website databases can be complex and time-consuming. cPanel makes it more accessible through various tools that allow you to streamline your website database.
-
Backups for Higher Availability
cPanel provides automated backups, which allow you to back up the website data automatically. It allows you to backup data daily, weekly, and monthly based on specific business requirements.
Now that you know how to install cPanel on your device, here is how to generate CSR using it.
Step-by-step Process to Generate CSR for cPanel
When you generate CSR, you need specific details regarding your organization, like business data, location details, and registration information.
Step 1. Login to your cPanel
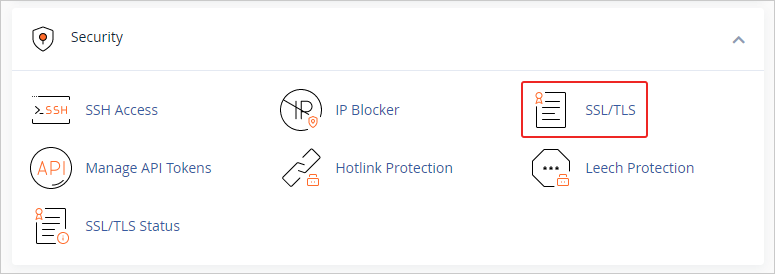
Login to your cPanel account, select the “Security” option and click SSL/TLS.

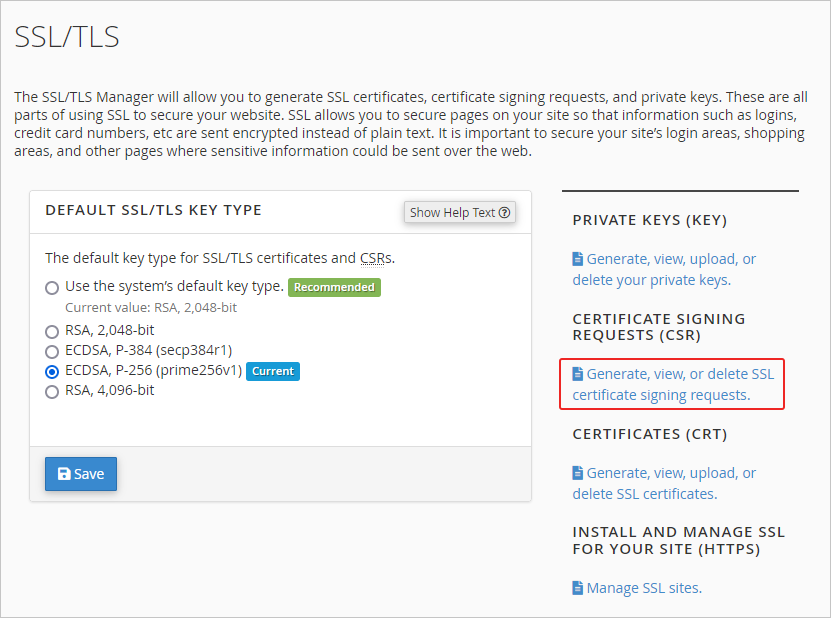
In SSL/TLS, you will find an option called certificate signing request (CSR); click on the option “Generate, view, or delete SSL certificate signing request.”

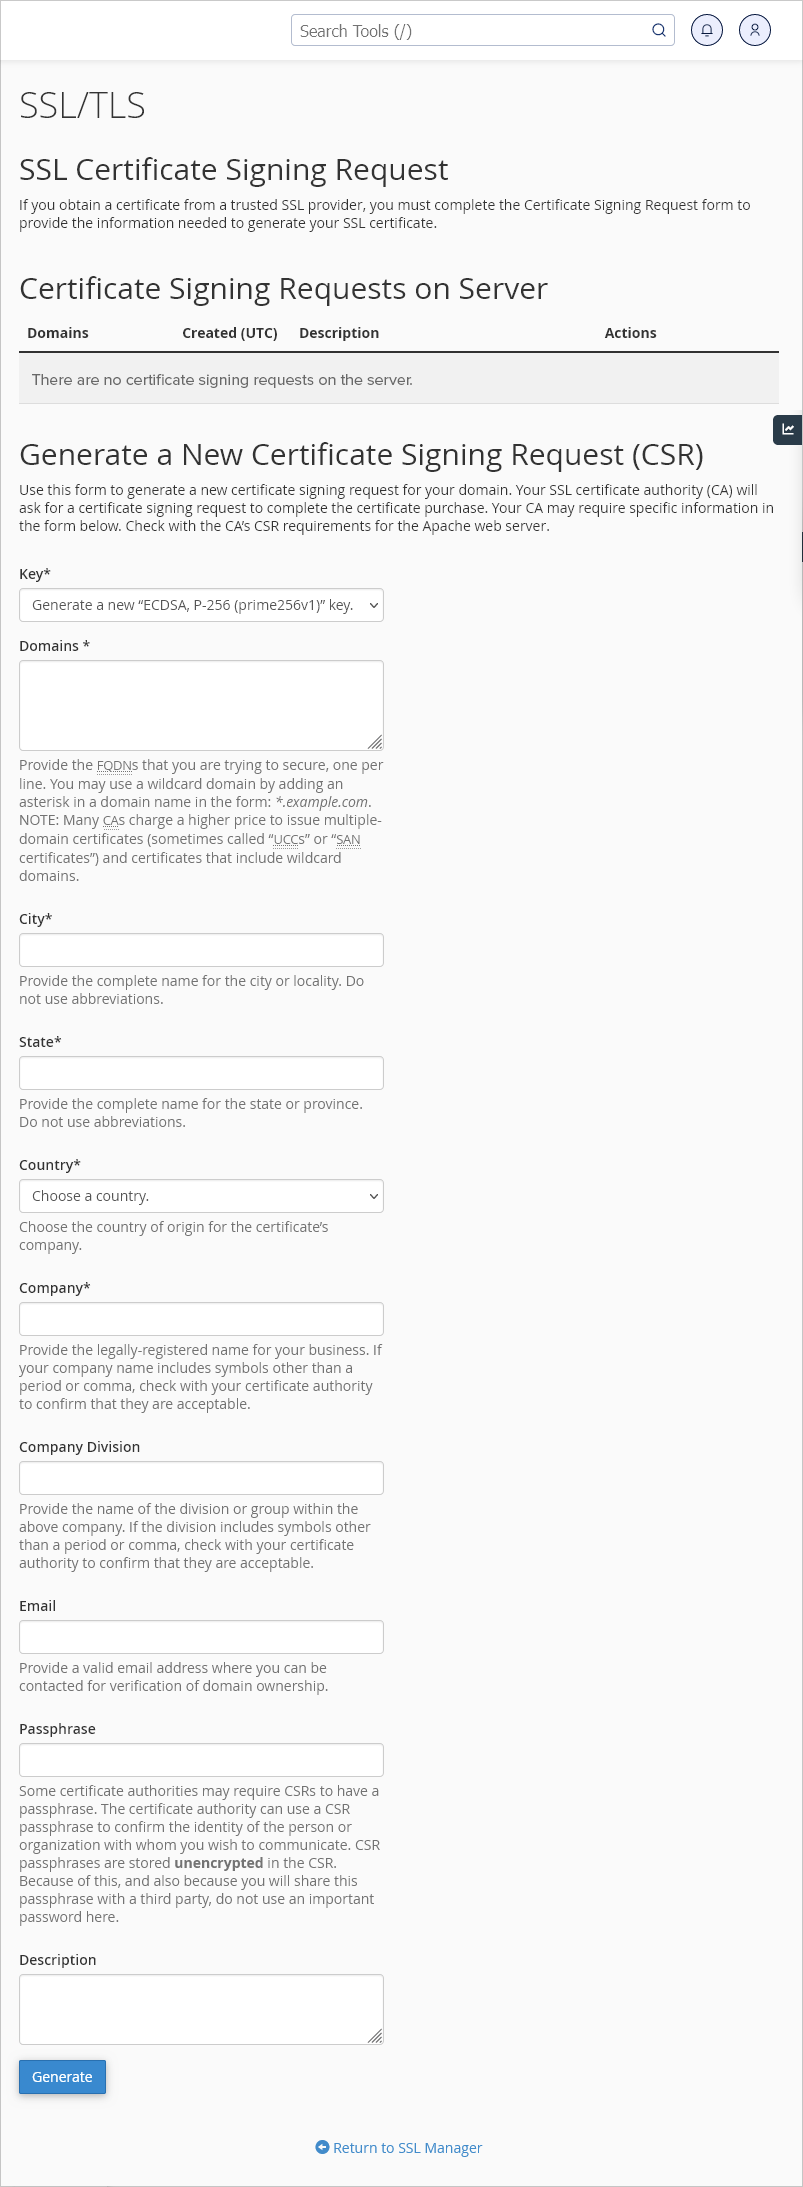
You can also define the default SSL/TLS key type on the right side. For example, you can choose a default or RSA 2048-bit, ECCCDSA P384, or RSA 4096-bit key. Once you click the “Generate, view, or delete SSL certificate signing request.” option, you will see a new window popup with a field requiring your organization details.
Step 2- Complete the necessary details related to your organization for CSR generation
CSR will have details that the certificate authority needs to authenticate to verify the requestor and then issue the certificate. So, suppose you are to generate CSR for cPanel. In that case, you need to submit the following details,

- A private key will be generated when you choose “Generate a new 2048-bit key,” if you already have a pre-generated key, select it from the dropdown menu.
- Enter the fully qualified domain name for which you are requesting the SSL certificate. However, if you choose a wildcard SSL certificate, you must put an asterisk sign before the domain name. At the same time, if you are using a multi-domain certificate, create CSR by entering each domain in a new field.
- Enter the city name or locality.
- Fill in the name of the state where your business is located
- Mention the origin country of the certificate requestor
- Provide details if the company is legally registered, including the registered company name, symbols, logos, and other aspects.
- Enter the division’s name within the organization from which the certificate is requested.
Note: Email, Passphrase and Description fields can be left empty.
Step -3 Generate the CSR.
The last field to add to the CSR is a description of keywords to locate specific CSRs in the list of many requests. Once you enter all the fields, there will be a ‘Generate’ button. Click on ‘Generate,’ and your encoded CSR will be ready.
Step -4 Copy the contents of CSR
Once you generate CSR for cPanel, copy the file’s content on a notepad on your device. Now copy the text from —–BEGIN CERTIFICATE REQUEST—– and —–END CERTIFICATE REQUEST—–. Submit the contents to CA for verifications so that the SSL certificate is issued for your business.
Key takeaways
Increasing cyberattacks requires security measures beyond the usual software-based antiviruses. SSL certificates help you secure the website from multiple cyber threats through encryptions. The first part of installing an SSL certificate on your website begins with CSR generation.
cPanel is an excellent platform to generate CSR for your SSL certificate request. In this article, the process of generating CSR for cPanel is step-by-step. However, the process may differ based on what type of operating system or device you are using. The compatibility of cPanel varies for different operating systems, so you need to make changes accordingly.


